No WikiHouse

Bench by Zoulamis

bench by Zoulamis

WikiHouse is an initiative started by a couple of British entrepreneurs who are trying to apply the success of open source software, and open source projects like Wikipedia to building homes. Designs for low-cost, high-performance, low-energy homes are shared, customized, printed using digital manufacturing techniques that employ 3D printers  and assembled. The designs are modular with each part numbered sequentially in the order it’s assembled in order to make it easy to assemble.

Here is a video that shows the assembly and disassembly of a WikiHouse frame. There are affordable 3D printers such as ShopBot, Marchant Dice and Blackfoot, which are basically computer controlled cutting machines. Another option is to use a CNC (Computer Numerical Machines) mill shop instead like FabHub or 100k Garages for 3D printing services. WikiHouse is a fascinating marriage of digital fabrication and open source technology.

Doug Ludwig  tile work

Doug Ludwig tile work

Who knows maybe one day all homes will be built like a WikiHouse but Lily Pond House was certainly not built like one. While Lily Pond House made maximal use of mass production  – from I-Joists to IKEA cabinets, and from laminated veneer beams to ApplyPly hardwood plywood, these engineered components were all meticulously customized by master craftsman. Through the construction process, we grew to appreciate the value of craftsmanship in building a quality house with meticulous detail. We have observed that craftsmanship in building a home requires being passionate about your work, caring about the quality of the final product, paying attention to details, and experience. The attention to detail started with our architects – Steven Theodore, who paid just as much attention to selecting the right door stops as to designing the sunscreens for optimum winter passive solar gain, and summer shading; and Wiebke Theodore, who worked just as hard in selecting the right tiles matching the natural sunlight and as hard in aligning the horizontal lines of the living room features.

Bob with parapet railing

Bob with parapet railing

As popularized by Malcolm Gladwell in Outliers, it takes about 10,000 hours of practice to master a skill in any field from carpentry to music, and from basketball to programming. Assuming you get to spend twenty hours a week in a job on practicing your skill, that is about for ten years of experience. Our building team had multiple craftsman with longer years of experience. Spang Builders foreman Chad never met a house building problem that he couldn’t find a clever solution for. If something did go wrong, our foreman was there to redo it right. Who knew that applying the wood filler to nail holes after three coats of polyurethane and before the final coat was the best way to do it? Chad’s crew – Charles, Robert, Vladimir, Fedor, Timothy – showed their craftsmanship in installing interior trim, hardwood floors, doors and windows and exterior cedar siding and Ipe decking. It was fascinating to watch how Bob scribed our decks to granite rock formations, and installed hundreds of Ipe plugs to hide the screw holes after making them one at a time.

Scribing Deck to  Granite

scribing deck to granite

It was fun to watch our framing contractor Mike Studley compute estimates in his head using empirical rules he developed over the years.  Anyone can paint but it is hard to replicate the quality of Drobish Brothers who can paint flawlessly without  taping. Jeff and Doug at Marcotte Electric were meticulous to the point of aligning the screw heads in every electrical outlet to pay homage to Frank Lloyd Wright. Our cabinet maker Greg Zoulamis customized several of the mass produced cabinetry, and crafted several gorgeous  ApplePly custom built-in’s based on our architect Wiebke’s design. Tile guru Doug Ludwig took his time to make sure the results matched not only our but his expectations. HVAC contractor Jim Godbout‘s Jeff and Tobie made sure that our plumbing and heating implementation was mechanical art. Our metalsmith Greg Mailing did a masterful job in crafting our stairs, railings, and floor to ceiling enclosure for firebox and television. C. O. Beck’s zinc siding not only looks gorgeous but will last 100 years with no maintenance. Amabile Brothers plaster came out so nice that we decided not to put any holes on our walls to hang our paintings instead opted for STAS picture hanging system.  Our architect/builder team chose S. Richer of Sanford for cement flatwork that produced a hard non-uniform floor for the living room and basement. It has been exactly a month since we moved in, and really appreciate our home built by multiple exceptional craftsman.

Doug the electrician  unpacking Pirce by Artemide

Doug the electrician unpacking Pirce 

our metalsmith Greg Mailing

our metalsmith Greg Mailing

Drywall vs Plaster

Traditional drywall consists of 5/8″ gypsum board (e.g. sheetrock) screwed to the studs. Drywall contractor applies tape to the seams between sheetrock boards, and coat joint compound over the seams and fasteners. If the final finish is to be a flat paint, a Level 4 finish is recommended, which involves the application of a couple of separate coats of joint compound (a mixture of water, limestone, perlite, talc, mica, and lots of other chemicals)  over all flat joints, and fastener heads. Level 5 is the highest-quality finish possible on regular drywall achieved by applying a skim coat of joint compound over the entire sheetrock surface to conceal slight differences in texture. Level 5 drywall finish produces a monolithic surface ideal for painting under different light conditions suitable for sheen and enamel paint finish. The biggest drawback of drywall is the amount of dust it produces with each sanding session.

Veneer Plaster

Veneer Plaster

Veneer plaster  finish is an alternative to drywall. Instead of a sheetrock, plasterer applies the very wet plaster (composition of plaster of Paris and sand with lots of water) over 5/8″ blue board, first over the seams and fasteners, and then skims 1/16′ – 1/8″ coat over the whole surface. Plaster bonds chemically with the paper in blueboard, which is engineered to create a tight bond with the plaster compound using a multi-ply paper where the outer ply absorbs the water in plaster coat while the inner ply protects the gypsum core with its water resistance, creating a surface that is much harder than regular drywall. In terms of compressive strength, veneer plaster finish is about 10 times stronger than a drywall, making it less likely to get dents and dings, and expose popped screws. In contrast to drywall, veneer plaster does not require sanding. Plus plaster is a vapor barrier ideal for bathrooms and kitchens, provides a better sound barrier than drywall and is more fire resistant.

Our architects Theodore + Theodore convinced us to go with unpainted veneer plaster instead of a drywall finish. Although the veneer plaster estimate had a substantial premium over Level 5 drywall finish, savings in forgoing the paint actually made the plaster option more economical. In contrast to the monolithic painted drywall look, the veneer plaster has a hard silky handmade finish with a natural off-white color. Another advantage is that plaster can be applied directly to concrete over a base coat, which came in handy in the Lily Pond House basement wall.

Spang Builders selected  Amabile Brothers as the plastering subcontractor. Amabile Brothers is a second generation family business, who learned the craft from their father, who in turn learned the craft from his dad by plastering closets when he was six years old. Our plasterer used Uni-Kal veneer plaster that dries in about 2 days. Plastering is an artistic skill honed over years of practice that involves packing and polishing the plaster to a mirror finish with a steel trowel, and running a clean felt brush over the plaster to take the sheen out. There is about half an hour window when plaster can be applied to a surface as the chemical reaction that occurs when the plaster is mixed with water causes it to crystallize quickly.

Plaster is becoming popular in green building practice. There is a funded KickStarter project – The Art and Science of Natural Plaster that  aims to produce an educational documentary on the use of natural plasters in architecture. Earthen plaster (a mixture of clay, sand and fiber) is another environmentally friendly option. American Clay sells earthen plaster in dozens of different colors. If you are DIY capable, there are lots of recipes for making plaster in Clay Culture.


Let there be lights

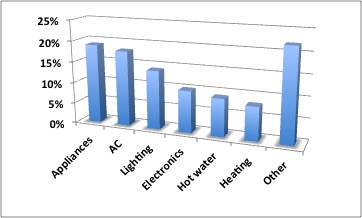
Thanks to Energy Star, Unites States is making its slow migration from the incandescent light bulb to LED lighting with an intermediate stop at CFL. Incandescent light bulb produces light with a wire filament heated with an electric current. In 1,880, the filament in Thomas Edison’s  incandescent light bulb lasted 1,200 hours while 95% of the energy went to producing heat instead of visible light. After 135 years, it still does the same wasteful thing. In contrast,  Compact Fluorescent Lighting (CFL) lasts 8,000 hours and produces the same amount of visible light with 25% of the energy expended by an incandescent light albeit with the necessity of mercury recycling. Light Emitting Diodes (LED) lighting lasts a whopping 50,000 hours and produces the same amount of visible light with only 10% of the energy expended by an incandescent light. As with every energy saving choice, the up front cost of an LED light is higher although the operating cost of an LED light is 10% of an incandescent light. The savings is not trivial as according U.S. Energy Information Administration lighting consumes 14% of the electricity in a typical American home.

Residential Electricity Usage

Residential Electricity Usage

The Energy Independence and Security Act of 2007 (EISA) set energy efficiency standards for light bulbs. Under the new law, household light bulbs will use at least 27% less energy by 2014 for a similar lumen output. The standards are technology neutral, which means any type of bulb can be sold as long as it meets the efficiency requirements. In fact, a number of manufacturers met the law by replacing the filament in the Edison light bulb with a halogen element. Given the performance we are going after in the Lily Pond House, we set out to eliminate not only the incandescent and CFL light fixtures but also the Thomas Edison era screw sockets by ensuring only LED lights can be used throughout the house.

Lily Pond House lighting was designed by Wiebke Theodore with a valuable assist on lighting fixtures by Greg Day Lighting. In selecting fixtures, especially for recessed lights, Insulation Contact (IC) rated new construction housings are attached to the ceiling supports before the ceiling surface is installed. IC housings must be installed wherever insulation will be in direct contact with the housing. The housing needs to be Air Tight (AT), which means it will not allow air to escape into the ceiling, thus reducing both heating and cooling costs. Unless you take care, some of these IC units are huge, taking valuable insulation space. For the recessed lights, we considered WAC and twicebright, and chose twicebright because the WAC option with its 0.9 cu ft volume took more than 10 times the volume of the twicebright option that took only 0.08 cu ft:

As with most green products, the origin of the space saving twicebright offering is from outside of USA. This company brings Scandinavian lighting innovations to the North American market. When you get rid of the Edison era screw base, you get the bi-pin base invented by Reginald Fessenden for the 1893 World’s Fair in Chicago.  The International Electrotechnical Commission (IEC) periodically updates the bi-pin standards. GU10 10 mm twist-lock bi-pin for the MR16 light bulb in twicebright fixture has been around since mid-2000s. As a historical note Westinghouse won the contract to wire the first electrified fair with Tesla’s Alternating Current (AC) against Thomas Edison’s Direct Current (DC), and invented the bi-pin base because Edison’s General Electric company refused to allow his patented screw-base bulbs to be used.

120 volts of AC line voltage needs to be transformed into 12V or 24V DC for LED lighting. There are two kinds of transformers for this purpose: Large and heavy Magnetic Low Voltage (MLV) transformers, and small and light Electronic Low Voltage (ELV) transformers that are typically enclosed in the lighting fixture rather than hidden somewhere by the electrician. Magnetic transformers generate a low frequency hum while electronic transformers are virtually silent. It is ironic that more and more of the electronic equipment and lighting in our homes (e.g. laptops, phones, LED lights, etc.) run on DC power while the electricity is distributed by AC, necessitating the distribution of dozens of AC/DC transformers around the house. As a case in point, our design called for dado StepLine LED lighting that fits into the thickness of drywall. However, its installation requires running wires to a remote transformer, a hassle after the plaster is done. So we ended up going with WAC LED200 that is an integrated design that fits into a standard junction box.

For Lilly Pond House, we have about 3 dozen twicebright recessed lights (used mostly on interior ceilings so as not to interfere with the house envelope) each with its dedicated electronic transformer. What is the carbon footprint of that? Wouldn’t be better if we had a DC distribution system? It is coming. The data centers with banks of computers have been using this solution for some time. EMerge Alliance – open industry association is developing a 24V standard for DC power distribution in commercial buildings. There is a big push in boating industry for distributed DC electric distribution system that will also save weight by replacing the mechanical fuse boxes with solid state ones. So the future of residential wiring will most likely be two independent wiring systems – a low voltage (24V DC) system for electronic equipment, lighting, and DC powered small appliances and a high voltage (120V AC) system for major appliances but until then we have to deal with the transition headaches.


Rising from the rubble

On 4 Aug. 2014, we went to the site to witness the demolishing our cottage. While it took greenGoat about 4 weeks to meticulously deconstruct  the material to be recycled, it took only 2 hours for Spang Builders to demolish our home. It was painful to see our old cottage to get pulverized into a rubble. We knew that our house served its useful life, but letting it go was an emotional ordeal for us. Although most of our memories were outside the cottage – sitting in front in our Adirondack chairs sipping a glass of wine enjoying the sunshine ripples on the pond, watching our kids catch bass in the pond, tracking the wildlife scent around our property with Beyaz, enjoying lobster bakes with our friends, there were still a lot of memories tied to the inside of the cottage – enjoying the crackling fire in our old fireplace, listening to the rainfall on the pond at dinner, watching our kids spend countless hours with the play kitchen on the deck. So we couldn’t watch the end of the demolishing process, and left.

Once the dust settled, we were surprised how fast the foundation footing and walls rose up. Since our house is pretty much on a ledge, the footing had to be several steps following the site topography. At the end, the foundation footing needed 20 steps. We attended the first pouring of the cement along with Steven and Wiebke by depositing the obligatory quarters in the foundation for everyone in the family. Compared to the cinder block foundation of the old cottage, our new home’s foundation footing is concrete anchored in the ledge and reinforced with rebar. It is fair it say that our new home’s foundation will outlive the age of the old cottage.

For foundation walls, the subcontractor used cast-in-place concrete construction by setting up removable interlocking forms for the pouring of concrete foundation walls. Steel rebar was added to provide strength to the wall. Since some sections of the foundation wall is exposed by design, vibrators were used to remove air bubbles. We will be able to asses the effectiveness of this effort better once the footing is covered up at the bottom of the foundation walls with landscaping, and the top of the foundation walls are covered  with siding. Once the concrete was cured, the forms were removed, and for the first time we could see our new home shaping up.

Schematic Design

South plan features large glass area for passive solar design

South Elevation features large glass area for passive solar design

Architects use a four stage process consisting of Schematic Design, Design Development, Construction Documents and Project Management. Schematic Design involves the development of visual conceptual design. Design Development refines the Schematic Design by specifying mechanical, electrical, plumbing, structural, and architectural details and materials. Construction Documents stage involves with the input of a structural engineer the generation of written and graphic instructions for the builder to build the house. Project Administration pages ensures that the architect’s design is interpreted by the builder as intended.

Theodores initially presented us two different schematic designs – one that involved moving our original square footprint towards East for a rectangular footprint with living room, dining room, kitchen, master bedroom in a row on the first floor, and the second one that shrunk the original footprint with living and, dining room in the front, and kitchen, and master bedroom in the back. While both designs had appealing features, we went with the second design because of its stronger connection to our old cottage footprint.

West Elevation

West Elevation – South and West elevation window overhangs let winter sun in and keep summer sun out


We loved several aspects of the design. The split-level design with two floors in the front, and three floors in the back with a basement fits perfectly into the topography of the ledge the house is built upon. In addition, the new design gives up the South West corner of the original footprint, connecting the outside living areas in front of the South and West elevations. While we had a barely usable basement before, Steven managed to include a study room, bathroom, and a utility room in the new basement by slightly raising the master bedroom. Three boxes with clean exteriors and flat roofs contribute to a stunning contemporary look. Expansive use of large sliding doors, corner windows and transoms  connects the inside and outdoor living areas. While the corner windows makes the corners disappear, transom windows act as natural landscape paintings that change with seasons. The interior open floor plan with suspended stairs visually connects the living areas. The design’s multi-level approach makes it a more livable place. For instance, the entry is a couple of steps lower than the main living area while the master bedroom, bathroom, and first floor hallway is a couple of steps are higher than the main living area, thus dividing the stairs into more easily climbable chunks.

East Elevation entrance integration with garage

East Elevation entrance integration with garage

One of our requirements for our Lily Pond House design was passive solar. Using passive solar design, the energy of the sun can provide a significant portion of a home’s heating needs even in Maine as Bill and Debbi Lord’s pioneering Maine Solar House has shown for the last 15 years.  One of the fortunate aspects of our location is that the southern exposure coincides with our ocean view as passive solar needs southern exposure for access to the sun between 9am to 3pm during the heating season. The new design’s South Elevation features large glass area for passive solar design. The floor of the living and dining area in the front is a concrete slab for thermal storage. South and West elevation window overhangs let winter sun in and keep summer sun out. North and East facing glass is minimized. During Design Development, some features of the schematic design got simplified but overall the design stayed intact. Onto Design Development.


Steven in situ with model

Steven in situ with model

North Elevation has minimal glass for passive solar design

North Elevation has minimal glass for passive solar design

Selecting an Architect

Our cottage on Lily Pond has been our summer home for over 25 years. Margaret and I always wanted to build a contemporary house on this location blessed with spectacular views in a private setting. We also wanted our new home to be green – respecting its environment sort of off the grid without going overboard towards a German passive house.

Initially, we researched prebuilt contemporary high performance homes. Santa Monica based LivingHomes sets the state of the art on the West coast while Blu Homes does the same on the East coast. While these companies offer several customizable plans, it became clear to us that our home on a ledge from the ice age within the constraints of the shore land zoning made the prebuilt option not feasible.

LivingHomes RK2 Model

LivingHomes RK2 Model

So we really needed an architect that can take advantage of the site’s southern exposure for passive solar but also can fit into the ledge dictated constraints while expanding allowed by the zoning laws. We knew that we would have no trouble finding green architects and builders after all Maine attracts environmentally conscious people. However, we were a bit apprehensive our unorthodox contemporary taste did not fit into the traditional Maine architecture.

We were pleasantly surprised that Maine is blessed with some outstanding  contemporary architects with green design portfolios that include Elliott + Elliott Architecture of Blue Hill, Theodore + Theodore Architects of Bath, Carol Wilson Architect of Falmouth, Van Dam Architecture and Design of Portland, Kaplan Thompson Architects of Portland, Briburn Studio of Portland, and Caleb Johnson Architects and Builders of Biddeford.

If you want to get a feel for the green contemporary architecture in Maine, check out the book Houses of Maine by Elliott + Elliott Architecture, Maine Modern: 50 Years of Contemporary Architecture in Maine exhibition, Green Architects’ Lounge edutainment podcast by Chris Briley of Briburn and Phil Kaplan of Kaplan Thompson.

Lily Pond House

Lily Pond House

Lily Pond

Lily Pond

We started our architect selection process in the summer of 2013. We interviewed a number of the contemporary architects to understand their contemporary design philosophy, exterior and interior level of design services, experience with high performance building design, and coastal zoning, and their approach to collaboration with the builder. After visiting portfolio samples, and having them visit our home to get their initial impressions, we decided to go with Steven and Wiebke Theodore as Steven’s and  Wiebke’s taste, and their philosophy of design meshed with ours, and we felt at ease with their personality and collaborative style. It is just that once you see a home in an architect’s portfolio (Ledge HouseIsland House ) that you can imagine living in, you are less worried what the new design will look like. So the journey starts.

Going for Contemporary

This blog chronicles our journey in building a contemporary energy efficient home in Maine. We have been spending our summers in our cottage for the last 27 years. In 2014, my wife Margaret and I decided to take the plunge by selling our Massachusetts home, and settling in Maine to experience life as it should be for the whole year.

Over the years, while our tastes varied with the styles of the times, our preference for the modern minimalist design stayed constant. We still adore our Scandinavian furniture that we bought right after getting married, and fondly remember our stays in Copenhagen, Rome, Prague shopping for contemporary home furnishings, and living with the modern design in Istanbul.

Scandinavian Design dining room furniture - circa 1979

Scandinavian Design dining room furniture – circa 1979

Deck View of our Conantum Home

Deck View of our Conantum Home

We lived 20 years in this Carl Koch and Donald Gillespie designed contemporary in Conantum – a neighborhood of Concord, MA with about 100 contemporary homes nestled next to Sudbury River and Walden Pond. Conantum was the idea of MIT economics professor, Rupert McLaurin, who envisioned affordable cost housing for young couples. Carl Koch, an architect and also a MIT professor, planned the houses. Joseph Kelley, a local contractor, was the builder. Carl Koch spent some time after graduation in Sweden where  blended  clean Scandinavian design into his work . Our Conantum home is an example of Koch’s mid-century architecture design with multi levels and walls of glass that invite the outdoors in. For an excellent overview of Conantum homes, see Bill Janovitz’ tour of Conantum.

Conantum houses were designed when energy was too cheap to matter. Our house tripled its original size with architect Donald Gillespie before we bought it. We spent our 20 years upgrading the heating system into a distributed one, insulating just about the whole house, installing energy efficient doors and windows house while remodeling without destroying the character of the house. No matter what we did, it never could reach the ACH (Air Changes per Hour) specification of a Pretty Good House. So we wanted a high performance contemporary design for our next house. So in the summer of 2013, our journey started with looking for an architect who could turn our needs and wants into a buildable vision.