Net Zero?

Lily Pond House Solar Plant

Lily Pond House Solar Plant

It has been exactly a year since we moved to our Lily Pond House. So how did our passive and active solar design perform? How close did we get to our net zero goal where annual energy consumption is roughly equal to renewable energy generation?

Starting with the passive solar design with South facing wall of glass, every sunny day was a joy during winter. On those sunny days with freezing temperatures, we often had to open windows as the temperature reached about 78 degrees after the living room cement slab could no longer absorb the sun’s heat. If the cement slab was not covered with furniture and rugs, we could have stored more solar energy but life trumps energy efficiency. Radiant heating did not have to kick in about 3+ hours after sunset while the cement slab warmed the house releasing the stored heat.

One of the best decisions our HVAC contractor Jim Godbout Plumbing & Heating made at the suggestion of our solar contractor Revision Energy was to go with an all electric energy for the house. Daikin Altherma, air to water heat pump that provides low temperature hot water for radiant heating and radiators, proved to be an efficient workhouse. We didn’t have a single day laboring to heat the house thanks to Theodore and Theodore Architects high performance shell design with minimal thermal bridging. Having radiant heating in the living room and basement cement slab, and bathroom tiles also  helped the cause with heat retention.

For active solar, Revision Energy designed a ballasted system that does not require the installation to penetrate the roof, which is a plus. However, solar panels are then limited to 15 degree pitch because beyond that the wind load gets too high and the required ballast gets too heavy for roof support. Although the optimal angle for solar panels is about 40 degrees for our location, the total annual production is fairly insensitive to installation angle since we can bank excess production for 12 months by feeding the excess solar electricity  into the grid. This is because the lower installation angle is optimized for the summer months when the sun’s radiant energy is at its highest. The penalty for 15 degrees tilt is less than 8%. Low pitch installations also hold snow longer than steeper ones;however, the penalty for snow cover is about less than a 10% effect in southern Maine.

Revision Energy estimated our expected electricity consumption at 11 MWh per year:

Plug Loads: Design estimate was 450 kWh a month, or 5,400 kWh per year. Although it was on the low side for a 2,500 sq. ft. house, it was justified by all LED lighting and  energy efficient appliances.

Heat: Design estimate was 15,000 BTU/sq. ft. for the expected annual heat load. That translates into 38 MBTU/year for space heating, given the 2.5 Coefficient of Performance (COP) for Daikin Altherma heat pump  yields an expected electricity consumption of an additional 4,450 kWh per year.

Domestic Hot Water: Design estimate was 40 Gallons per Day (GPD) load with two occupants at 20 GPD each. That translates to an annual load of 10 MBTU/year. Given the 3.25 Energy Factor  performance of our Voltex Hybrid Electric Heat Pump  water heater, that translates to an additional electric load of 1,200 kWh per year.

11 MWh solar plant design called for 36 255 -Watt Canadian Solar photovoltaic panels. Unfortunately, our two roofs could only accommodate 27 panels. So we had to go with the more efficient 300 Watt LG NeON panels resulting in a 10 MWh per year power generation.

Since roughly half of our total electric load is space heating, our electric consumption in winter is effectively supplied by our solar production in summer. Our best month was May with 50 kWh electricity production on sunny days while our worst month was January with 20 kWh electricity production on sunny days except when the panels were covered with snow, which was about 10 days. Since photovoltaic panels can capture scattered sunlight to create electricity, they generated electricity even on cloudy days.

12 Month Power Generation

Solar Electricity Production by Month

Revision Energy’s initial design employed Solectria PVI inverters, which convert the DC output of a photovoltaic (PV) solar panel into AC that can be fed into the electrical grid or used by house electrical network.  As the solar  crew was laying out the roof and moving panels around to accommodate the parapet, and roof obstacles (e.g. vent pipes), they felt there might be enough partial shading on this system so it would really benefit from a slightly more advanced inverter solution. At their suggestion, we went with a Solaredge system that combines a central string inverter in the basement with individual panel optimizers on the back of each individual panel to improve system performance, especially when part of the array is shaded. In contrast to a traditional inverter system where the partial shading of a panel typically results in the total loss of power from that panel in order to optimize the power of all panels in the same string, Solaredge recovers the partial power from the shaded panel. In addition, Solaredge provides module level monitoring and performance information, which is a pretty neat bonus.

Upper Roof Panels Performance

Upper Roof Panels Performance

Solar system was designed to be a net generator in summer and net consumer in winter.  As the data shows, Lily Pond House Power Plant is a net generator roughly 5 months (May, June, July, August, September), a net consumer 5 months (November, December, January, February, March), and roughly balanced  in the transition months (April, October).
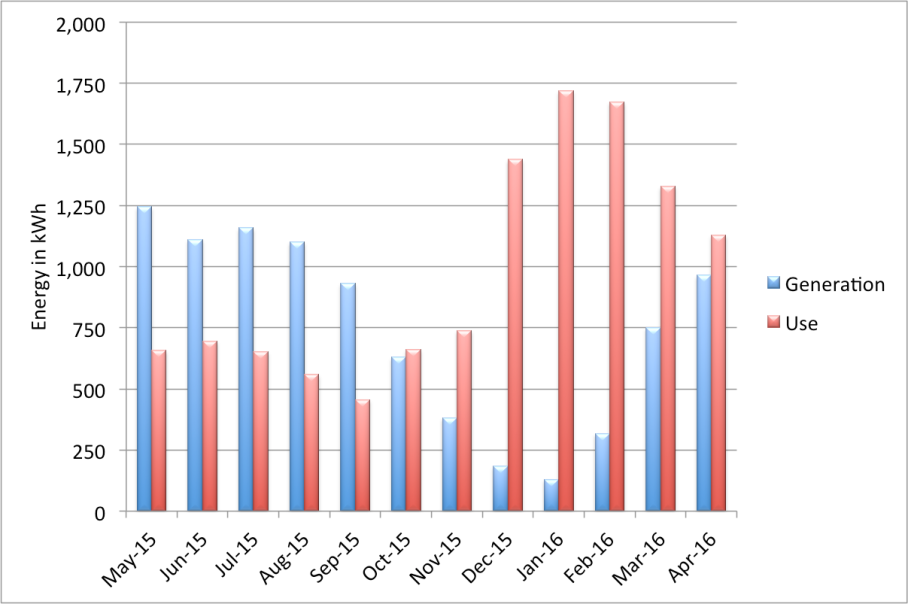
Generation vs. Usage

Generated vs. Consumed Electricity

So what is the bottom line? We consumed 11.5 MWh while the consumption estimate was 11MWh. So if we could generate 11 MWh per our original design, we would have a net zero home. We took a 10% hit due to roof constraints, and another 10% hit because 10 MWh solar design produced only 9 MWh, mostly due to parapet shading. At the end, we generated 9 MWh of solar electricity while we consumed 11.5MWh. For the 2.5 MWh shortfall, we paid $300, which we really can’t complain about given the environmental wellness, which encourages us to live in harmony with the Earth by taking action to protect it:
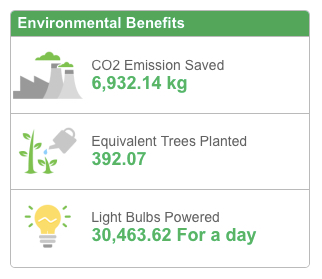
Enviromental Benefits


Passive solar

Passive solar house design is not new. During 9th through 13th century, American Indians built their homes in south facing Pueblo canyon hills that provided them heat from the low winter sun, and cool from high summer sun with natural overhangs. It is a shame that these centuries old best practices are ignored today in new residential construction. Passive solar is different than Passive House – a standard developed in Germany for European climate and adapted to American climate by Passive House Institute US (PHIUS). In our house tours, we got to see one Passive House design, and a number of passive solar designs. Passive House design with super thick walls and small windows looked like a bunker to us – not our cup of tea. In contrast to a Passive House that needs to limit the intake of winter sun because of over heating due to super insulation, passive solar welcomes the winter sun’s warmth, stores it for night time use, treats our winter blues with sunlight, and lets us enjoy the scenery outside.

If you are interested in passive solar home design, “The Solar House: Passive Heating and Cooling” by Daniel Chiras is a must read. After researching passive solar design in Building Science, Green Building Advisor, Mother Nature Network, Zero Energy House, I dived into The Solar House by Chiras. Passive solar has a pretty straightforward set of high level rules. You need large south facing windows (north facing in the southern hemisphere)  with high Solar Heat Gain Coefficient (SHGC), a thermal mass to store the sun’s heat, and overhangs to block summer sun on the south facing glazing while letting winter sun in. Of course, you still need a professional to design the system as there are several intricate nuances (e.g. different SHGC ratings of south, east, west and north facing windows, backup heat system sizing, air quality in a super tight house shell, etc.) in passive solar design but that shouldn’t prevent you learning more about it to become a more knowledgeable homeowner, and better yet an evangelist.

The US Federal government in its infinite wisdom gives tax credit to energy efficient windows with U-factor 0.30 or lower, which is fine, and SHGC 0.30 or lower, which is not fine. U-factor is the reciprocal of the area weighted sum of R-values for the various window components (e.g. glazing, frame, etc.). So the smaller the U-factor, the better the window keeps the inside hot, or cold air in. SHGC represents the fraction of the solar energy that the window passes through to heat the house. So a window with an SHGC of 0.30 based on Federal guidelines block 70% of the sun’s energy that can be used to heat the house. That may be a great design objective for hot climates like Florida but for cold climates like Maine, windows with SHGC 0.55 or higher is the desired target. Given the one size fits all standard in US, you need to shop for Canadian, or European windows if you want passive solar. More on that at a later post.

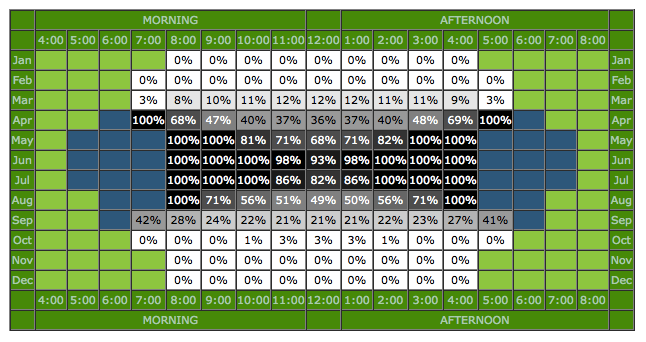
In passive solar design, if the south-facing glass is less than 7% of the floor area, then thermal mass is not needed as building mass in framing, drywall, etc. is sufficient to absorb the solar gain but you won’t be getting passive solar heating after sunset. South facing wall of glass in our Schematic Design dictates thermal mass. In our home, cement slab in the front living area, and secondarily the basement slab serves as thermal mass. As a rule of thumb, for every sq ft of south facing glass area over that 7 percent of total sq ft of the house, you need about 5½ sq ft of 4-inch-thick slab.  Overhangs are designed to block out the solar noon on summer solstice (June 21 when the sun is the highest in the sky), and let the solar noon completely in on winter solstice (Dec. 21 when the sun is the lowest in the sky). Our architect specified 4 ft. south facing sunscreens in Design Development. There are on line calculators like the Overhang Design tool by Sustainable Design to design the overhangs with the final size often dictated by compromise. Here is the expected shading performance of our sunscreen design. We’ll get full use of sun’s warmth October through March, and transition in to full shade in April, and out of shade in October.

Expected south facing sunscreen shading performance

Expected south facing sunscreen shading performance

Spang Builders filled the interior of the foundation below the slab level with gravel, and mechanically compacted. Before pouring the cement for the slab to be used as thermal mass, a vapor barrier is placed at the bottom. Our slab subcontractor used Stego Wrap vapor barrier, and foundation rebar and wire mesh to give strength to the cement. The slab bottom and perimeter is insulated with XPS insulation. Our mechanical design also called for radiant heating so that had be in place before the concrete. Our mechanical designer used Crete-Heat floor panel system with its own insulation and vapor barrier, and Uponor radiant heating. For additional reading, I recommend Designing a Passive Solar Slab that explains the diminishing returns of a slab depth more than 4 inches. More on our mechanical system in a later post.

You don’t have to have an ugly cement slab to go with passive solar. Flatwork craftsman can make a concrete slab look like marble. These folks use a power trowel (sort of like a floating orbital sander with multiple steel trowels rotating at the bottom) to apply a smooth finish to concrete slabs. This process is called burnishing, which produces a shiny, smooth and abrasive resistant hard surface. Burnishing brings a marbleized non-uniform metallic-look to the floor. Our architect/builder team chose S. Richer of Sanford to perform this feat. The results speak for themselves. Our team used a poly backed fabric blanket cover to ensure wet curing over a 28 day period. The blanket ensures that the slab remains wet for the entire curing period.

Rising from the rubble

On 4 Aug. 2014, we went to the site to witness the demolishing our cottage. While it took greenGoat about 4 weeks to meticulously deconstruct  the material to be recycled, it took only 2 hours for Spang Builders to demolish our home. It was painful to see our old cottage to get pulverized into a rubble. We knew that our house served its useful life, but letting it go was an emotional ordeal for us. Although most of our memories were outside the cottage – sitting in front in our Adirondack chairs sipping a glass of wine enjoying the sunshine ripples on the pond, watching our kids catch bass in the pond, tracking the wildlife scent around our property with Beyaz, enjoying lobster bakes with our friends, there were still a lot of memories tied to the inside of the cottage – enjoying the crackling fire in our old fireplace, listening to the rainfall on the pond at dinner, watching our kids spend countless hours with the play kitchen on the deck. So we couldn’t watch the end of the demolishing process, and left.

Once the dust settled, we were surprised how fast the foundation footing and walls rose up. Since our house is pretty much on a ledge, the footing had to be several steps following the site topography. At the end, the foundation footing needed 20 steps. We attended the first pouring of the cement along with Steven and Wiebke by depositing the obligatory quarters in the foundation for everyone in the family. Compared to the cinder block foundation of the old cottage, our new home’s foundation footing is concrete anchored in the ledge and reinforced with rebar. It is fair it say that our new home’s foundation will outlive the age of the old cottage.

For foundation walls, the subcontractor used cast-in-place concrete construction by setting up removable interlocking forms for the pouring of concrete foundation walls. Steel rebar was added to provide strength to the wall. Since some sections of the foundation wall is exposed by design, vibrators were used to remove air bubbles. We will be able to asses the effectiveness of this effort better once the footing is covered up at the bottom of the foundation walls with landscaping, and the top of the foundation walls are covered  with siding. Once the concrete was cured, the forms were removed, and for the first time we could see our new home shaping up.

Schematic Design

South plan features large glass area for passive solar design

South Elevation features large glass area for passive solar design

Architects use a four stage process consisting of Schematic Design, Design Development, Construction Documents and Project Management. Schematic Design involves the development of visual conceptual design. Design Development refines the Schematic Design by specifying mechanical, electrical, plumbing, structural, and architectural details and materials. Construction Documents stage involves with the input of a structural engineer the generation of written and graphic instructions for the builder to build the house. Project Administration pages ensures that the architect’s design is interpreted by the builder as intended.

Theodores initially presented us two different schematic designs – one that involved moving our original square footprint towards East for a rectangular footprint with living room, dining room, kitchen, master bedroom in a row on the first floor, and the second one that shrunk the original footprint with living and, dining room in the front, and kitchen, and master bedroom in the back. While both designs had appealing features, we went with the second design because of its stronger connection to our old cottage footprint.

West Elevation

West Elevation – South and West elevation window overhangs let winter sun in and keep summer sun out


We loved several aspects of the design. The split-level design with two floors in the front, and three floors in the back with a basement fits perfectly into the topography of the ledge the house is built upon. In addition, the new design gives up the South West corner of the original footprint, connecting the outside living areas in front of the South and West elevations. While we had a barely usable basement before, Steven managed to include a study room, bathroom, and a utility room in the new basement by slightly raising the master bedroom. Three boxes with clean exteriors and flat roofs contribute to a stunning contemporary look. Expansive use of large sliding doors, corner windows and transoms  connects the inside and outdoor living areas. While the corner windows makes the corners disappear, transom windows act as natural landscape paintings that change with seasons. The interior open floor plan with suspended stairs visually connects the living areas. The design’s multi-level approach makes it a more livable place. For instance, the entry is a couple of steps lower than the main living area while the master bedroom, bathroom, and first floor hallway is a couple of steps are higher than the main living area, thus dividing the stairs into more easily climbable chunks.

East Elevation entrance integration with garage

East Elevation entrance integration with garage

One of our requirements for our Lily Pond House design was passive solar. Using passive solar design, the energy of the sun can provide a significant portion of a home’s heating needs even in Maine as Bill and Debbi Lord’s pioneering Maine Solar House has shown for the last 15 years.  One of the fortunate aspects of our location is that the southern exposure coincides with our ocean view as passive solar needs southern exposure for access to the sun between 9am to 3pm during the heating season. The new design’s South Elevation features large glass area for passive solar design. The floor of the living and dining area in the front is a concrete slab for thermal storage. South and West elevation window overhangs let winter sun in and keep summer sun out. North and East facing glass is minimized. During Design Development, some features of the schematic design got simplified but overall the design stayed intact. Onto Design Development.


Steven in situ with model

Steven in situ with model

North Elevation has minimal glass for passive solar design

North Elevation has minimal glass for passive solar design