Lily Pond House Solar Plant
It has been exactly a year since we moved to our Lily Pond House. So how did our passive and active solar design perform? How close did we get to our net zero goal where annual energy consumption is roughly equal to renewable energy generation?
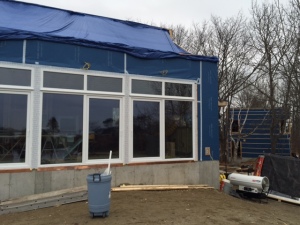
Starting with the passive solar design with South facing wall of glass, every sunny day was a joy during winter. On those sunny days with freezing temperatures, we often had to open windows as the temperature reached about 78 degrees after the living room cement slab could no longer absorb the sun’s heat. If the cement slab was not covered with furniture and rugs, we could have stored more solar energy but life trumps energy efficiency. Radiant heating did not have to kick in about 3+ hours after sunset while the cement slab warmed the house releasing the stored heat.
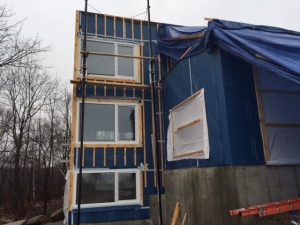
One of the best decisions our HVAC contractor Jim Godbout Plumbing & Heating made at the suggestion of our solar contractor Revision Energy was to go with an all electric energy for the house. Daikin Altherma, air to water heat pump that provides low temperature hot water for radiant heating and radiators, proved to be an efficient workhouse. We didn’t have a single day laboring to heat the house thanks to Theodore and Theodore Architects high performance shell design with minimal thermal bridging. Having radiant heating in the living room and basement cement slab, and bathroom tiles also helped the cause with heat retention.
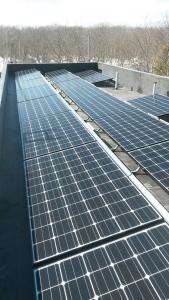
For active solar, Revision Energy designed a ballasted system that does not require the installation to penetrate the roof, which is a plus. However, solar panels are then limited to 15 degree pitch because beyond that the wind load gets too high and the required ballast gets too heavy for roof support. Although the optimal angle for solar panels is about 40 degrees for our location, the total annual production is fairly insensitive to installation angle since we can bank excess production for 12 months by feeding the excess solar electricity into the grid. This is because the lower installation angle is optimized for the summer months when the sun’s radiant energy is at its highest. The penalty for 15 degrees tilt is less than 8%. Low pitch installations also hold snow longer than steeper ones;however, the penalty for snow cover is about less than a 10% effect in southern Maine.
Revision Energy estimated our expected electricity consumption at 11 MWh per year:
Plug Loads: Design estimate was 450 kWh a month, or 5,400 kWh per year. Although it was on the low side for a 2,500 sq. ft. house, it was justified by all LED lighting and energy efficient appliances.
Heat: Design estimate was 15,000 BTU/sq. ft. for the expected annual heat load. That translates into 38 MBTU/year for space heating, given the 2.5 Coefficient of Performance (COP) for Daikin Altherma heat pump yields an expected electricity consumption of an additional 4,450 kWh per year.
Domestic Hot Water: Design estimate was 40 Gallons per Day (GPD) load with two occupants at 20 GPD each. That translates to an annual load of 10 MBTU/year. Given the 3.25 Energy Factor performance of our Voltex Hybrid Electric Heat Pump water heater, that translates to an additional electric load of 1,200 kWh per year.
11 MWh solar plant design called for 36 255 -Watt Canadian Solar photovoltaic panels. Unfortunately, our two roofs could only accommodate 27 panels. So we had to go with the more efficient 300 Watt LG NeON panels resulting in a 10 MWh per year power generation.


Since roughly half of our total electric load is space heating, our electric consumption in winter is effectively supplied by our solar production in summer. Our best month was May with 50 kWh electricity production on sunny days while our worst month was January with 20 kWh electricity production on sunny days except when the panels were covered with snow, which was about 10 days. Since photovoltaic panels can capture scattered sunlight to create electricity, they generated electricity even on cloudy days.
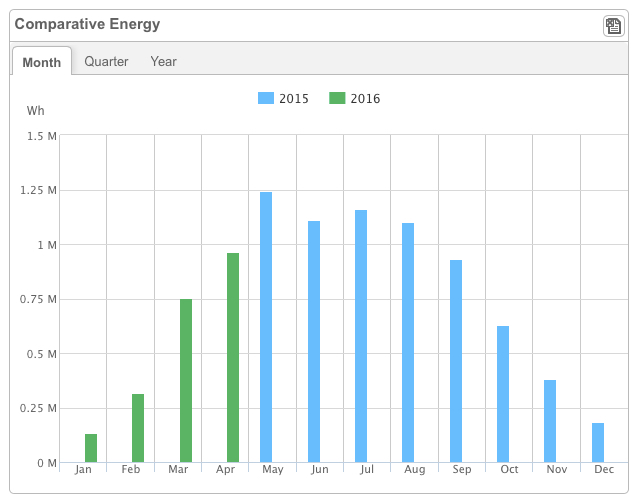
Solar Electricity Production by Month
Revision Energy’s initial design employed Solectria PVI inverters, which convert the DC output of a photovoltaic (PV) solar panel into AC that can be fed into the electrical grid or used by house electrical network. As the solar crew was laying out the roof and moving panels around to accommodate the parapet, and roof obstacles (e.g. vent pipes), they felt there might be enough partial shading on this system so it would really benefit from a slightly more advanced inverter solution. At their suggestion, we went with a Solaredge system that combines a central string inverter in the basement with individual panel optimizers on the back of each individual panel to improve system performance, especially when part of the array is shaded. In contrast to a traditional inverter system where the partial shading of a panel typically results in the total loss of power from that panel in order to optimize the power of all panels in the same string, Solaredge recovers the partial power from the shaded panel. In addition, Solaredge provides module level monitoring and performance information, which is a pretty neat bonus.
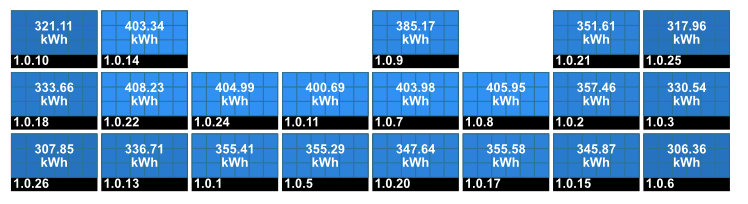
Upper Roof Panels Performance
Solar system was designed to be a net generator in summer and net consumer in winter. As the data shows, Lily Pond House Power Plant is a net generator roughly 5 months (May, June, July, August, September), a net consumer 5 months (November, December, January, February, March), and roughly balanced in the transition months (April, October).
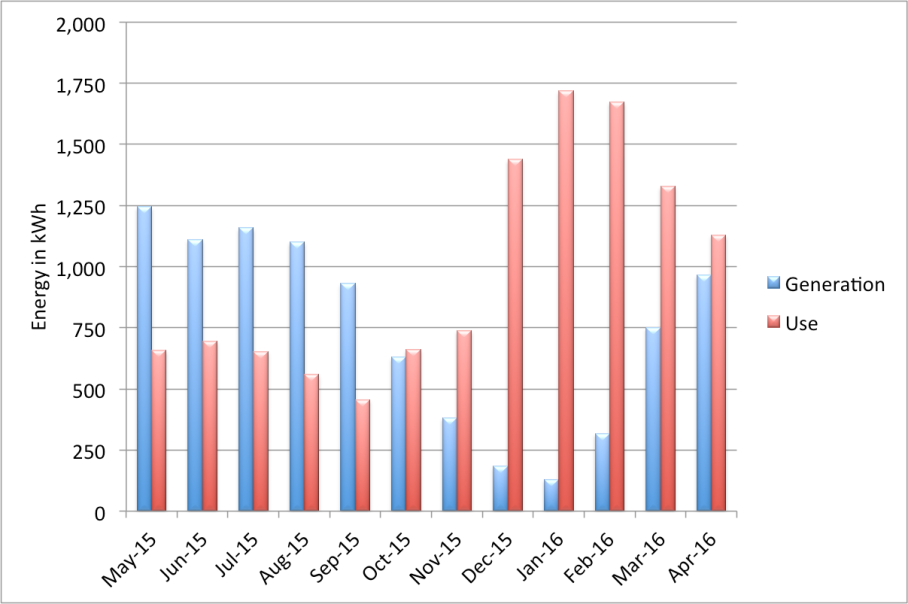
Generated vs. Consumed Electricity
So what is the bottom line? We consumed 11.5 MWh while the consumption estimate was 11MWh. So if we could generate 11 MWh per our original design, we would have a net zero home. We took a 10% hit due to roof constraints, and another 10% hit because 10 MWh solar design produced only 9 MWh, mostly due to parapet shading. At the end, we generated 9 MWh of solar electricity while we consumed 11.5MWh. For the 2.5 MWh shortfall, we paid $300, which we really can’t complain about given the environmental wellness, which encourages us to live in harmony with the Earth by taking action to protect it: